View Source Astarte Dashboard
Astarte provides a built-in UI that can be used for managing Interfaces, Devices, and Triggers. The Dashboard simplifies the development phases of applications that make use of Astarte, as well as troubleshooting activities.
You can browse the source code of the Dashboard software on its GitHub repository.
introduction
Introduction
The Astarte Dashboard is a Single Page Application that provides users with an overview of their Realm and a user-friendy way of managing it on any web browser. The Dashboard is designed to be a quick and easy way to give you immediate feedback on your work and as a quick and intuitive way to configure your realm. It is not designed to be operated by end-users, rather by infrastructure maintainers, owners who need information on the system status, and those working on projects based on Astarte. It is shipped by default with the Astarte standard distribution.
The Dashboard is a graphical client for Astarte APIs; it shares similar features with the CLI client astartectl, the command-line utility to manage Astarte.
The Dashboard helps you manage:
In case your Astarte distribution comes packaged with the Flow framework, the Dashboard is probably configured to manage Flow resources as well.
Please note that the Flow framework is not available for use in a docker-compose environment since it relies on Kubernetes APIs to operate.
how-to-access-it
How to access it
Depending on how you are using Astarte, here is where you can find the Dashboard:
- Docker-compose: if you are using a local instance of Astarte via
docker-compose, you will find it by pointing your browser to the default addresshttp://dashboard.astarte.localhost. To login, fill in the name of your realm and a valid JWT token: if you possess the realm private key, as it is the case if you followed the Astarte in 5 minutes guide, you can generate the token with the commandastartectl utils gen-jwt all-realm-apis -k <private_key>. - Astarte Cloud: if you are using our managed Astarte option, you can hop onto our Console, find or create your realm and click the Dashboard button.
- Kubernetes cluster: in this case, if the Dashboard is enabled, it can be usually found at
dashboard.<base Astarte URL>. Refer to your system administrator for more details.
main-overview
Main overview
Upon successful login, the main screen is the home page that provides an overview of the realm status and resources.
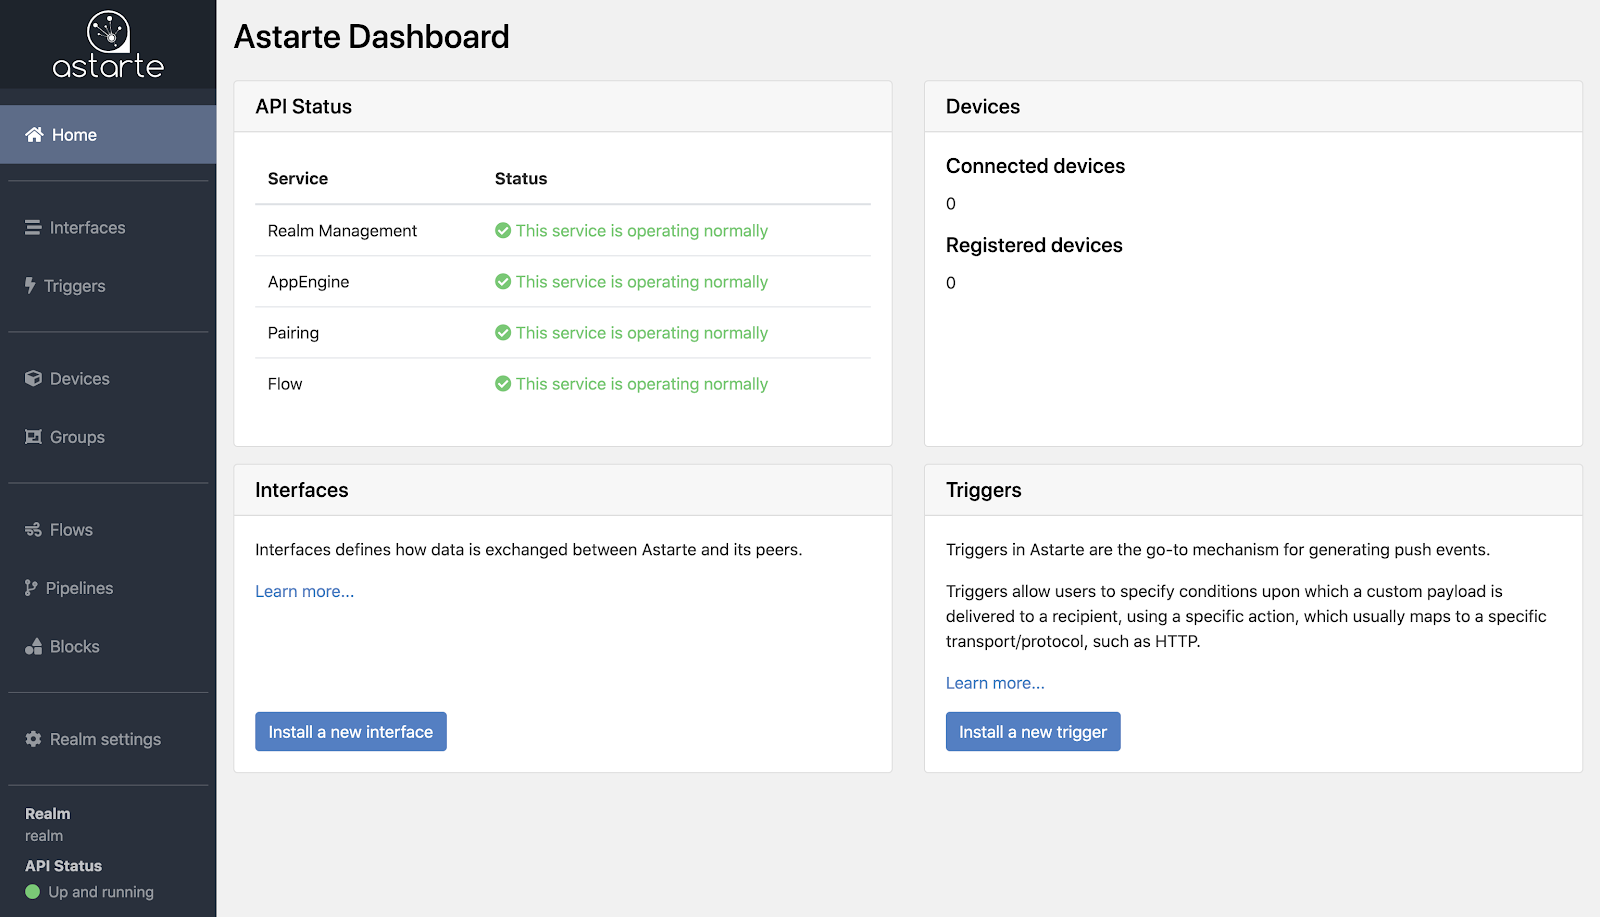
api-status
API Status
The API Status gives you general information about the status of services:
Realm Management is an administrator-like API for configuring a Realm. It is used for managing Interfaces and Triggers.
AppEngine is Astarte's main API endpoint for end-users. AppEngine exposes a RESTful API to retrieve and send data from/to devices, according to their interfaces. Every direct device interaction can be done from here. It also exposes Channels, a WebSocket-based solution for listening to device events in real-time with the same mechanism and semantics used by Triggers.
Pairing takes care of Device Authentication and Authorization. It interacts with Astarte's CA and orchestrates the way devices connect and interact with Transports. It also handles Device Registration. Agent, Device and Pairing interaction is described in detail here.
Flow is the API endpoint for Astarte Flow, used for managing Blocks, Pipelines, and Flows.
Possible statuses are:
- This service is operating normally.
- This service appears offline.
A general status on API health is also present in the app's sidebar, thus always providing a feedback regardless of which page you are currently visiting.
realm-resources
Realm resources
Within the main overview, a brief summary is available as well for the existing resources of the realm: registered and connected devices, installed interfaces, and installed triggers.
More detailed overviews of each resource are available in the dedicated Dashboard sections, accessible via the navigation links in the Dashboard's side menu.
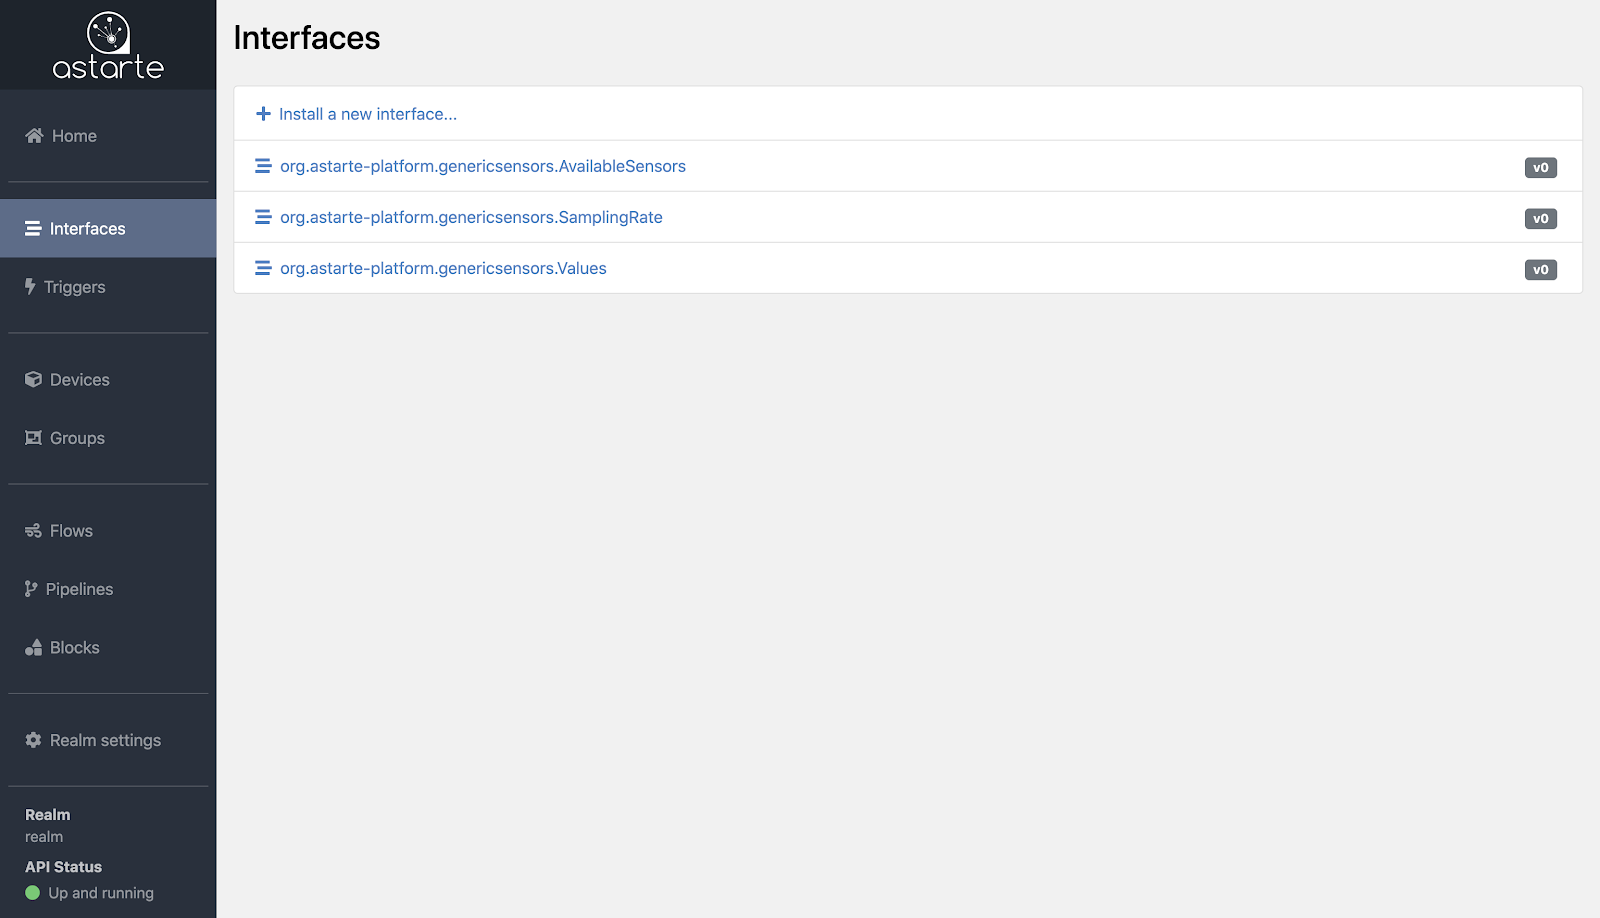
interfaces
Interfaces
Interfaces are a core concept of Astarte which defines how data is exchanged between Astarte and its peers.
You can navigate to this section thanks to the side menu of the Dashboard. A list of all installed interfaces is displayed, together with their major versions.
installing-interfaces
Installing interfaces
From the Interface list, clicking on the Install a new interface button will load up the Interface Editor, an interactive tool that you can use to configure your interfaces.
The Interface Editor provides you with two ways to define your interfaces: on the left panel, a graphical frontend, while on the right panel you may input a JSON definition to achieve the same result. Each panel updates automatically whenever the other is changed.

While defining a new interface, the Interface Editor will help you in supplying the right options and filling in mandatory entries such as:
- Name: an arbitrary name, formatted in reversed DNS casing.
- Major and Minor versions: based on Semantic Versioning.
- Type: indicates whether data is streamed continuously (
datastream) or is stateful and persistent (properties). - Ownership: the write-only allowed actor. All the other actors are read-only.
- Mappings: a list of endpoints that represent the data structure, following REST controller semantics.
You can learn more about Interface definitions in their documentation's section.
Note that when creating interface drafts, or for testing purposes in general, it is recommended to
use 0 as the major version: to prevent data loss, Astarte allows only interfaces where
major_version equals 0 to be deleted.
managing-interfaces
Managing interfaces
From the Interface list, you can select an interface to load and view its details in the Interface Editor. Clicking on the name of the interface will select its latest revision; clicking on a specific major of the interface will select the latest revision for that major. Note that interface revisions follow the Semantic Versioning convention.
Once the Interface Editor is loaded you can review, update or delete the definition of the interface.
Note that to prevent data loss, Astarte allows only interfaces where major_version equals 0 to
be deleted.
For similar reasons, when updating the definition of an interface, the Interface Editor will not
allow you to change core properties on a minor version update. If you need to apply substantial
changes, you can define and install a new major version for the interface.
triggers
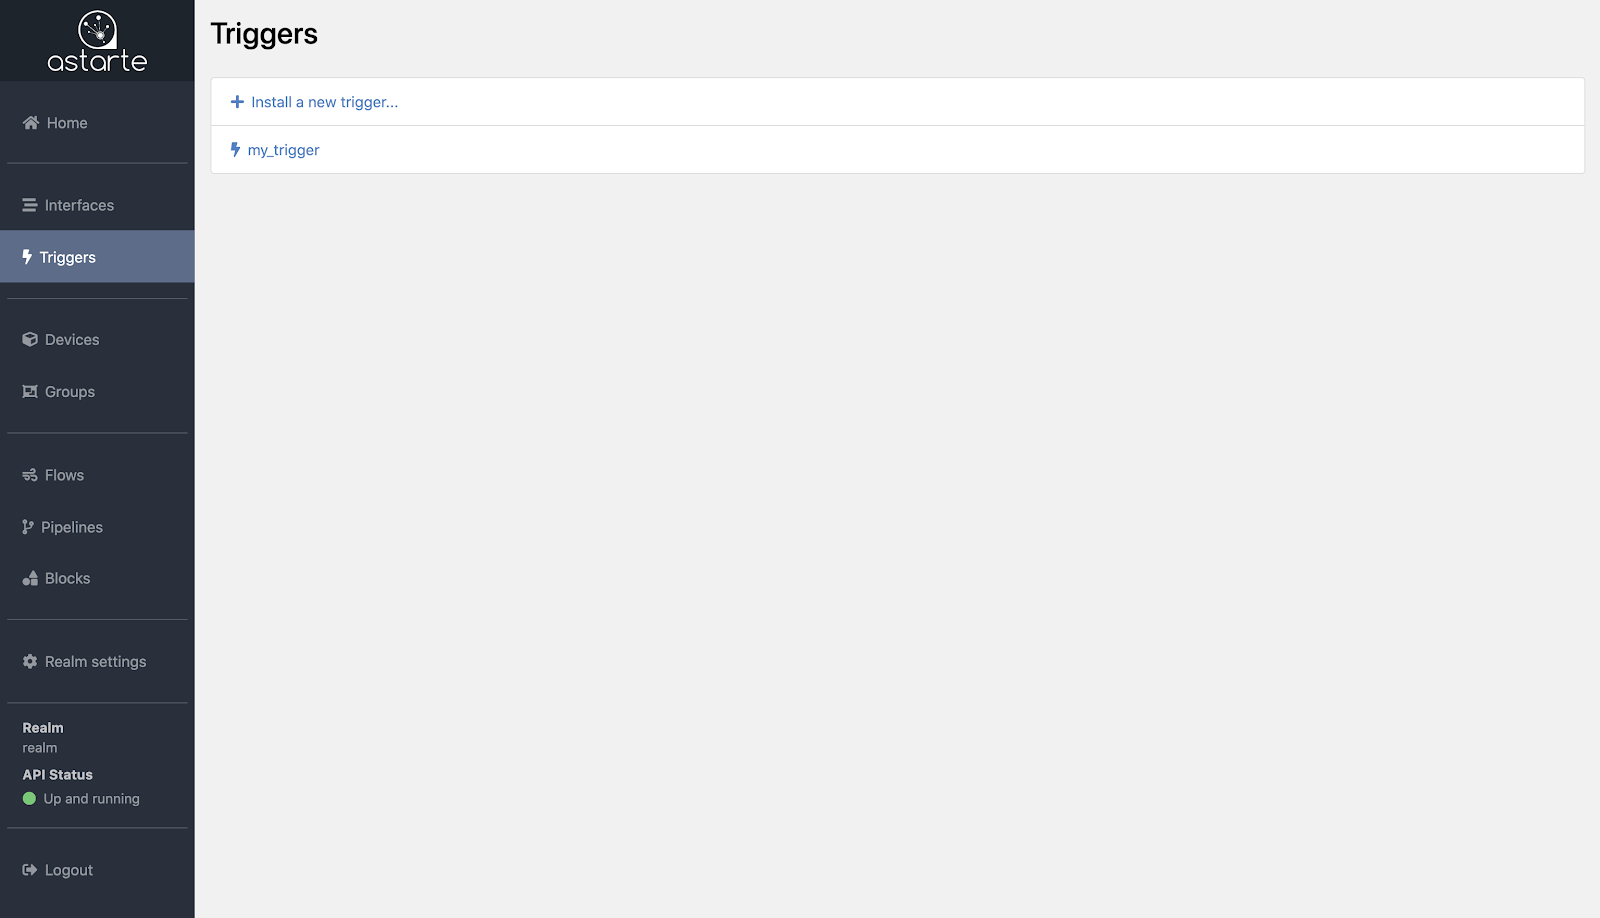
Triggers
Triggers in Astarte are the go-to mechanism for generating push events.
You can navigate to this section thanks to the side menu of the Dashboard. A list of all installed triggers is displayed.
installing-triggers
Installing triggers
From the Trigger list, clicking on the Install a new trigger button will load up the Trigger Editor, an interactive tool that you can use to configure your triggers. It works in a very similar fashion to Interface Editor and shares the same User Interface.
The Trigger Editor provides you with two ways to define your triggers: on the left panel, a graphical frontend, while on the right panel you may input a JSON definition to achieve the same result. Each panel updates automatically whenever the other is changed.
The graphical tool dynamically loads installed Interfaces in the Realm and eases trigger creation by providing not only linting and validation, but also dynamic resolution of Interface names.
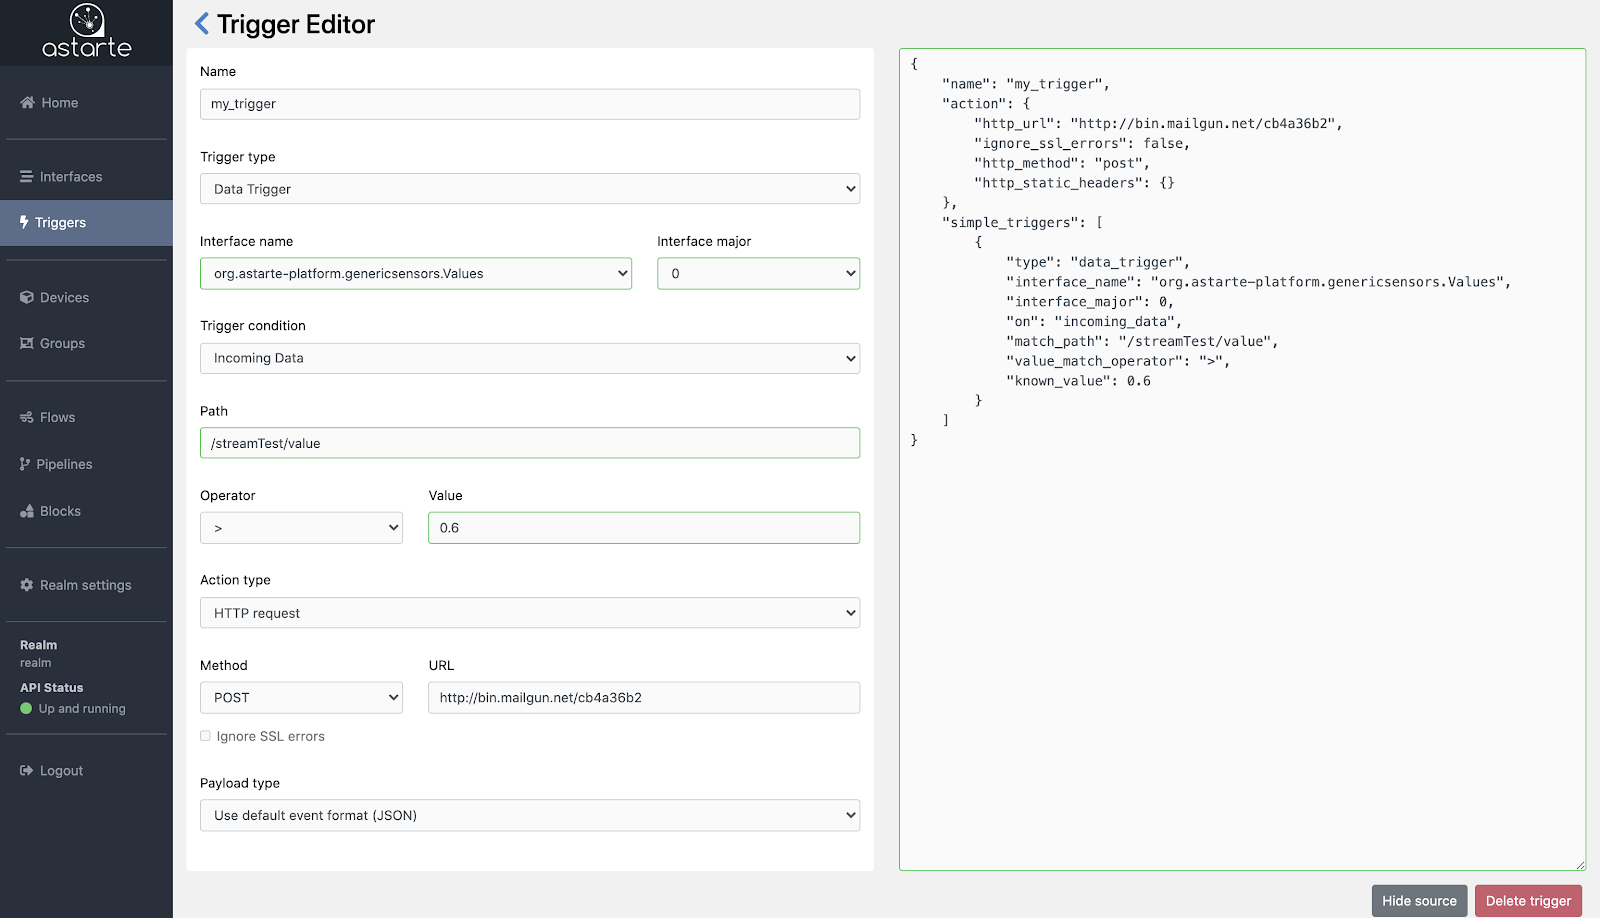
You can learn more about Trigger definitions in their documentation's section.
Note that due to how triggers work, you should install the trigger before a device connects. Doing otherwise will cause the trigger to kick in at a later time, and as such no events will be streamed for a while.
managing-triggers
Managing triggers
From the Trigger list, you can select a trigger to load and view its details in the Trigger Editor.
Once the Trigger Editor is loaded you can review the definition of the trigger.
You can also delete the trigger instance by clicking on the Delete trigger button.
devices
Devices
Devices are Astarte's main entities for exchanging data.
You can navigate to this section thanks to the side menu of the Dashboard. A list of all registered devices is displayed.
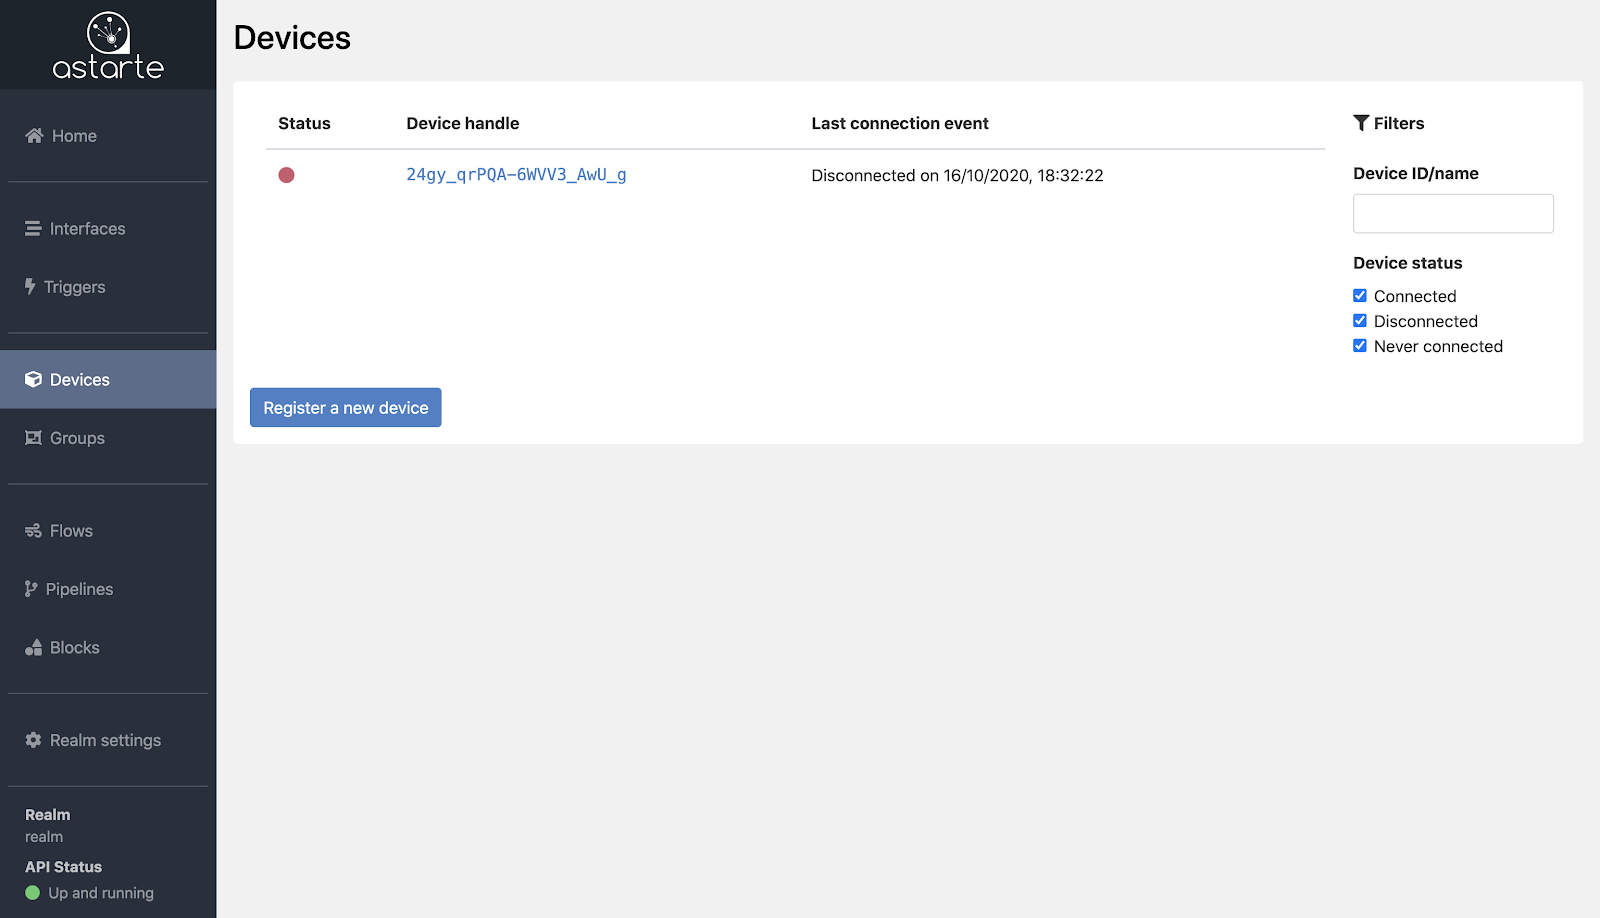
Each device in the list is displayed together with info regarding its status and the last connection event. The status is represented by a grey dot if the device never connected to Astarte, a green dot if it is currently connected, a red dot if it is currently disconnected. The last connection event reports, if available, the date of the last connection or disconnection.
A filter section is present on the side of the list to aid the search for specific devices, filtering the list by device ID, name, connection status, or configured attributes.
registering-a-device
Registering a device
From the Device list, new devices may be registered by clicking on the Register a new device button which will take you to the registration page.
Here you can proceed with the registration of the device by:
- providing a device ID: either by generating a random ID or by specifying a
NameandNamespace UUIDto generate the ID in a deterministic fashion. - optionally declaring the initial introspection of the device: this is an indication of the list of interfaces that the device will use to exchange data.
You can learn more about Devices and the registration process in their documentation's section.
device-status-and-details
Device status and details
From the Device list, you can select a device to navigate to its dedicated page.
Here you can review and manage different info about your device.
Device Info
- Device Info: displays info such as the device ID and the device Name alias, if set. It reports whether the device is currently connected or disconnected, or if it was never connected. From this section you can also momentarily Inhibit credentials for the device, preventing it to obtain access to Astarte; or you can directly Wipe credential secret of the device, a permanent action which will require to register the device again to have a new Credential Secret.
- Aliases: where you can manage custom aliases for the device. Note that setting a
namealias will provide a name for the device. - Attributes: a dedicated section to attach arbitrary info to the device, in a key-value form.
- Groups: where you can review and manage the Groups the device belongs to.
- Interfaces: a list of all currently and previously used interfaces. Clicking on an interface's name will load a dedicated page to review data exchanged by the device through that interface.
- Stats: a rundown on exchanged data via different interfaces. Here you can review, in both visual and numeric form, the quantity of bytes and messages the device is exchanging over each interface. This way you can always know at a glance which interfaces are the busiest and how chatty your device is.
- Status Events: here is info collected by Astarte regarding the IP addresses involved in the connections of the device to Astarte, the dates of first registration and credentials request, and the dates of last connection and disconnection, if available.
- Live Events: a section that reports live events regarding the device. It makes use of Astarte Channels and displays the connections, exchanged data, and errors of the device, as they happen in real-time.
groups
Groups
Groups are logical collections of devices to ease the management and querying of devices.
You can navigate to this section thanks to the side menu of the Dashboard. A list of all existing groups is displayed, together with the number of total and connected devices for each group.
creating-a-group
Creating a group
From the Group list, clicking on the Create a new group button will load a dedicated page to setup the new group.
You are required to specify a name for the group and to select at least one device that will belong to it. Indeed, note that a group must contain at least one device to exist.
To confirm the creation of the new group, click the Create group button.
managing-groups
Managing groups
From the Group list, you can select a group to view its configuration on a dedicated page. Here you can review the list of devices that belong to it.
To remove a device from a group, click on the Delete icon next to it.
To add a device to a group, you can first navigate to the device's page and then add it to a group from there.
To delete a group, remove all devices that belong to it and the group will automatically cease to exist.
blocks
Blocks
Blocks are computation units that can be chained together to define a logical computation topology.
You can navigate to this section thanks to the side menu of the Dashboard. Here is a list of all
existing blocks, both custom and native ones: the former ones are those defined by you, the latter
ones are those provided by Astarte and are displayed with a native label.
creating-blocks
Creating blocks
From the Block list, clicking on the Create button will load a dedicated page to define a new block.
Here you can define the block by specifying:
- A
namefor the block. - A
type, betweenProducer,ConsumerorProducer & Consumer, depending on how the block should treat messages and connect to other blocks. - A
schema, reporting the JSON Schema definition of how a configuration should look like for the block. - A
source, containing the implementation of the block, written in the DSL format for Pipelines.
Confirm the creation of the block by clicking on the Create new block button.
To learn more about block definition you can read their documentation's section.
managing-blocks
Managing blocks
From the Block list, you can select a block to view its definition in a dedicated page.
Here you can review the details of the block such as the block type, the schema and, if it is a custom block, its source.
To delete a block, click on the Delete block button. Note that you cannot delete native blocks
provided by Astarte.
pipelines
Pipelines
A Pipeline is a computation blueprint (therefore a description) built as a chain of blocks.
You can navigate to this section thanks to the side menu of the Dashboard. Here is a list of all existing pipelines from which you can review, manage and instantiate them.
creating-pipelines
Creating pipelines
From the Pipeline list, clicking on the Create button will load up the Pipeline Editor page, an interactive tool that you can use to configure your pipeline.
The Pipeline Editor is composed of two parts:
- A sidebar listing all available Blocks, grouped by type
- A space where you can drag & drop blocks, connecting them to effectively design a pipeline
You can read more about the Pipeline Editor on the dedicated documentation.
Once you have designed your pipeline, you can review and specify its:
namesource, containing the implementation of the pipeline, written in the DSL format for Pipelines.schema, reporting the JSON Schema definition of how a configuration should look like for the pipeline.description, explaining the scope and supposed usage of the pipeline.
Then hit the Create new pipeline button to confirm the definition of the pipeline.
managing-pipelines
Managing pipelines
From the Pipeline list, you can select a pipeline to view its definition in a dedicated page.
Here you can review the details of the pipeline such as the pipeline description, its schema, and its source.
To delete a pipeline, click on the Delete pipeline button.
flows
Flows
Flows are specific instances of a pipeline, created providing concrete values to the parametric configuration of a pipeline.
You can navigate to this section thanks to the side menu of the Dashboard. Here is a list of all existing flows. Each flow reports its current status and the pipeline it originated from.
To review the details of a Flow, click on its name to load up the dedicated page.
To delete a flow, click on the Delete icon next to it.
instantiating-flows
Instantiating flows
From the Pipeline list, clicking on the Instantiate button of a Pipeline will load the Flow configuration page; from there you can supply a name and a configuration for the flow before hitting the Instantiate Flow button to confirm.
realm-settings
Realm Settings
You can navigate to this section thanks to the side menu of the Dashboard. Here you can review and update settings for your realm.
You can update the public key of the realm, which is useful if you mean to use a new private key to generate auth tokens. Please note that it is a permanent action and Astarte will prevent interactions that use auth tokens generated with the previous key.